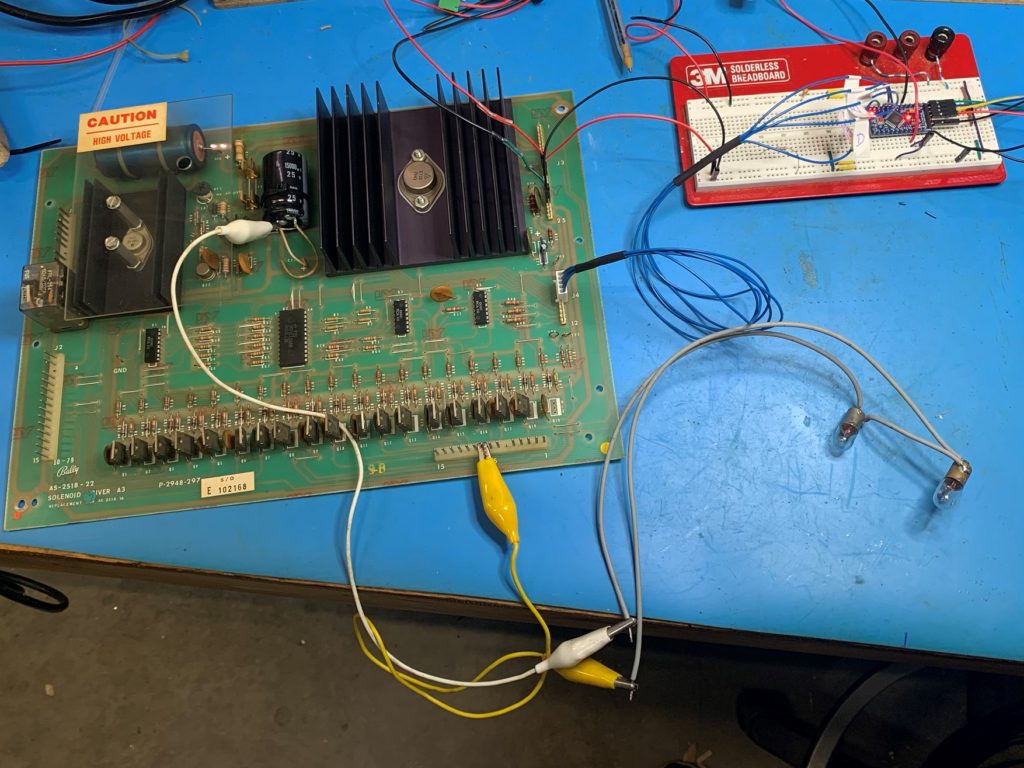
The Bally AS-2518-22 Solenoid driver board (SDB) can be put through a test regime using an Arduino. The heart of this driver board is the 74145 4-to-16 line decoder. In this project, I developed a simple testing rig using an Arduino to test all of the “Momentary Solenoid” drive components.
Parts Used:
- Arduino Pro Mini (clone)
- USB Serial programmer for Arduino
- 0.1” molex pins
- 5-Way 0.1” Molex shell
- 24AWG hookup wire
- Some 0.1” jumper wires to connect power.
- Alligator leads
- 2 x #44 bulbs

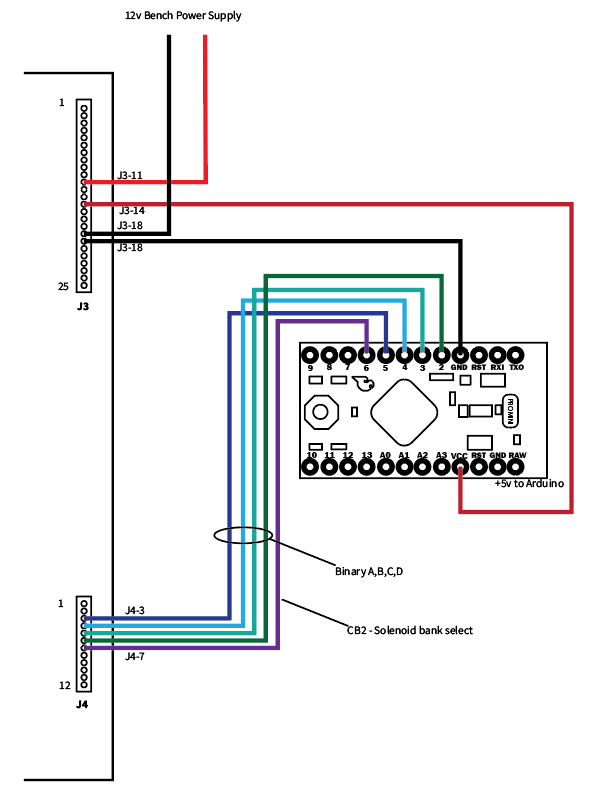
In this design, the Arduino sets up a binary signal (on PB0-3) driving the A,B,C and D inputs to the 74145. The Arduino then takes the CB2 line low causing one of the 15 output lines of the 74154 to go low.
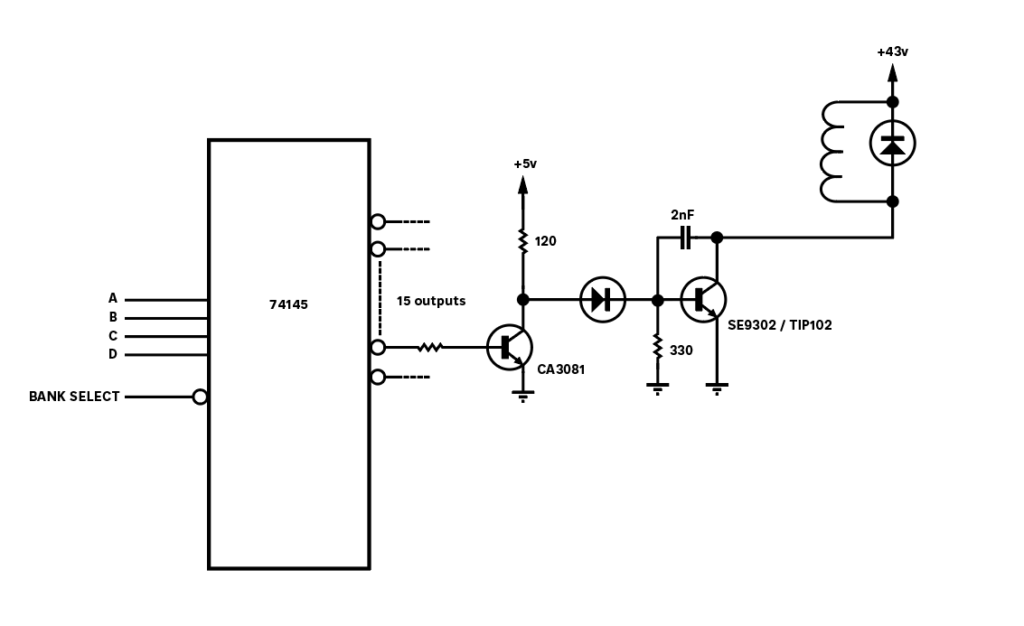
Transistor Operation
At startup, the outputs from the 74145 are all high. This turns on the CA3081 transistors, depriving the main drive transistors of their base current and the solenoid output will be off.
When the appropriate binary input (A,B,C,D) is applied and then CB2 line pulled low, the 74145 will activate one of the 15 output lines. This active low output from the 74145 results in the associated CA3081 transistor turning off. With this transistor turned off, the main drive transistor can get its base current via the 120ohm resistor and the diode. This will turn the transistor on and a ground will be extended to the output line, powering the solenoid.
The 330 ohm resistor and the capacitor provide a small delay in turning off the solenoid. I suspect this is to ensure a clean turn off or a minimum on time.

Connecting The Arduino
The Arduino needs to connect to the A,B,C,D, CB2 (Solenoid band select) and ground. In my setup, I supplied 12v DC to the SDB on J3-11 (12v) and J3-18 (GND). I then was able to use the 5V output from J3-14 to power the Arduino.
It is important to note the this SDB has had the under board GND and 5V wire modifications performed. Without these you will need to jumper TP3 to TP2 to power the digital parts of the SDB.

/*
 * 17-APR-2020
 *
 * Test rig for driving the Bally AS-2518-22 Solenoid Driver
 *
 * This program will provide inputs to the 74154 via the J4 connector.
 *
 * Author:  Malcolm Byrne
 *
 */

#define DATA_A 2      /*    Momentary Solenoid Data A    J4-6  */
#define DATA_B 3      /*    Momentary Solenoid Data B    J4-5  */
#define DATA_C 4      /*    Momentary Solenoid Data C    J4-4  */
#define DATA_D 5      /*    Momentary Solenoid Data D    J4-3  */
#define PIN_CS 6      /*    Solenoid Bank                J4-7  */


void setup() {
  // put your setup code here, to run once:
  pinMode(DATA_A, OUTPUT);
  pinMode(DATA_B, OUTPUT);
  pinMode(DATA_C, OUTPUT);
  pinMode(DATA_D, OUTPUT);
  pinMode(PIN_CS, OUTPUT);
  pinMode(LED_BUILTIN, OUTPUT);


  /* Initialize the 74154 with 1111 (out put 15) */
  digitalWrite(DATA_A, HIGH);
  digitalWrite(DATA_B, HIGH);
  digitalWrite(DATA_C, HIGH);
  digitalWrite(DATA_D, HIGH);

  digitalWrite(PIN_CS, HIGH);
  delay(20);
  digitalWrite(PIN_CS, LOW);
  delay(20);
  digitalWrite(PIN_CS, HIGH);


}

void loop() {
  int i;

  for ( i=1; i<16; i++) {
    solenoid_activate(i);
    strobe();
    delay(100);
    strobe();
    delay(100);
  }

}


void strobe() {
  int on_time = 300;  /* Milli Seconds */

  digitalWrite(PIN_CS, HIGH);
  digitalWrite(PIN_CS, LOW);
  digitalWrite(LED_BUILTIN, HIGH);

  delay(on_time);
  digitalWrite(PIN_CS, HIGH);
  digitalWrite(LED_BUILTIN, LOW);
}

void solenoid_activate( int i ) {
  /* Activate solenoid number  1 to 15 */
  int A,B,C,D;

  if (i<1) return;
  if (i>15) return;


  if (( i & 0b0001) > 0) {
    digitalWrite(DATA_A, HIGH);
  } else {
    digitalWrite(DATA_A, LOW);
  }

  if (( i & 0b0010) > 0) {
    digitalWrite(DATA_B, HIGH);
  } else {
    digitalWrite(DATA_B, LOW);
  }

  if (( i & 0b0100) > 0) {
    digitalWrite(DATA_C, HIGH);
  } else {
    digitalWrite(DATA_C, LOW);
  }

  if (( i & 0b1000) > 0) {
    digitalWrite(DATA_D, HIGH);
  } else {
    digitalWrite(DATA_D, LOW);
  }
}
